Rudder
October 23, 2004
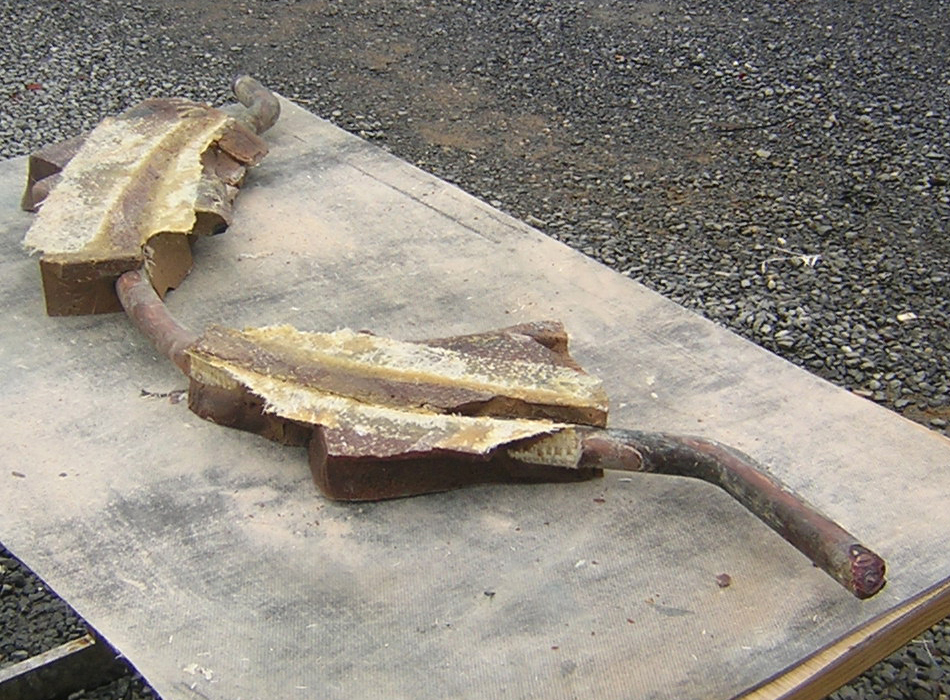
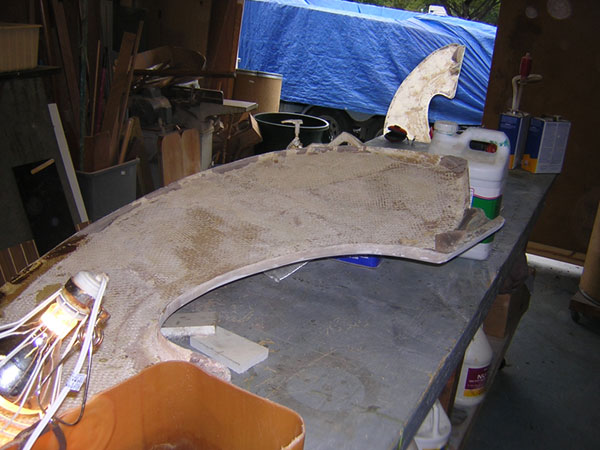
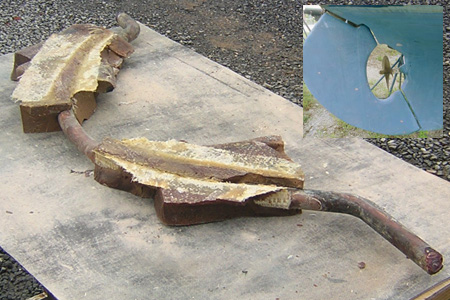
I just got these from the company that's rebuilding my rudder. Not the greatest pics, but informative. In my case, the bronze shaft is the only skeletal frame work inside the rudder. The large chunks attached to the shaft are the remaining pieces of the epoxy that filled and bonded the 2 rudder halves together. Not sure, but it looks like there is a layer of glass that came with the epoxy when the halves were separated. Notice the corrosion at the bottom end of the shaft. I'm told there is also crevice corrosion towards the top of the shaft were it went into the hull. The other picture is of the inside of the left half of the rudder. A new layer of rovenwoven has been added to the inside of both halves for added strength or maybe to replace what came out with the epoxy.
Although not finalized, the current plan is to have a new SS shaft welded up to match the critical angles and to tie the top and bottom shafts together with some sort of web structure. A rigid structural foam and epoxy will be used to fill and bond the 2 rudder halves together, and then a layer of fiberglass tape to cover the whole seam. Fair it into the rest of the rudder and as a last step, do a West epoxy type treatment to the whole rudder.
One additional item I want to add is a delrin bushing to the rudder shoe. I think others might have done something similar. This would look like an upside down top hat and fit inside the shoe with the brim of the hat on the top outside of the shoe. The bottom few inches of the shaft will be turned down to fit inside of this bushing. This way, there will be delrin bearing surface between rudder shaft and shoe. So that's the plan. Any thoughts?
FYI, the attached image file Rudder0629.jpg is the large version of the file shaft.jpg in case you want to see it up close and personal.
Steve - #28 (still working on a new name)
Date: Sat May 29, 1999 7:27 pm
Has anyone removed the 38# bronze rudder shoe, removed rudder, replaced cutless bearing and inspection hose. If so, what problems did you encounter? I highly recommend it. The old dogboat had her 22nd birthday in January.
Date: Sun May 30, 1999 12:34 pm
In the 19Oct96 Nor'easter that ravaged the LI Sound, Hull80 Pianissimo held on her American Yacht Club mooring longer than others who rammed her on their way to doom: 10 member boats were sunk or holed or smithereened on rocks, 7 were found on beaches or marshes including my Seawind II 32' Ketch, whose hull strength excited the crew of the excellent recovery crew who used airbags, craddle and rollers to pull her out, and towed her to her winter yard in Mamaroneck NY around the corner
SeaTow did more damage to the boat than the storm, beaching or stray boats by trying to slavage her at night despite postings on the hull (reclaimed by owner, keep away), indeed my insurance company sued them for what they paid me and more! In the process, Seatow broke my main sail track, an aft cleat, and cracked the rudder by tryng to turn the boat despite the rudder being imbedded in firm sand and mud, before they were shunned off by AYC personnel.
This long story to say we had to remove the rudder, eliminate the cracked skin and epoxy core (without fiberglass, a construction deficiency in my opinion), check out the rudder post which was in good shape, and rebuild a rudder around it. Brewer's Post Road Boat Yard in Mamaroneck NY selected a load bearing, closed cell polyurethane foam called Klegecell (a French product I have used in shipbuilding for liquefied gas carriers). The result is a much stronger and lighter rudder plane.
On the propeller shaft, we replaced the cutless bearing while we were at it, put in a new dry/dripless stuffing box, and more recently went to a Max Prop 16-10 for better backing power and lower resistance under sail. On the rudder post, the Yard found no reason to replace the lower bearing.
However, my purchase survey in April 96 had found the upper gudgeon seal broken and we had to replace that, with much difficulty due to seizing on the shaft of the lower seal portion. Finally, after installing a Windhunter windvane and autopilot, we noticed a slight movement of the wood/fiberglass bracket under the quadrant when hitting the end blocks, and we glassed in reinforcements on the forward side, against the cockpit aft wall.
All that was performed by the Yard named above. Naval Architect/Engineer manager Paul Muenzinger receives copy of this, in case he wishes to add a comment on difficulties, vesides the hard removing of the upper gudgeon seal. My thanks go to him, Chief Engineer Peter Espinosa and their team for excellent conceptual, design and implementation work throughout.
Date: Tue Jun 1, 1999 11:24 pm
Yes to all. If your boat is coming out, and this area has not been inspected for awhile, I would strongly suggest removing at least the rudder for a close inspection. No problems with removing the rudder shoe or the rudder. The rudder shoe was held in place with three horizonially 5/8 inch bronze bolts. All three bolts were installed from the port side. Did not think the rudder would weight so much, but it took me to the ground once freed.
Replacing the rudder cutless bearing was somewhat more difficult. I knew there was set screws holding the cutless but I could not locate them externally. Ended up driving the cutless out anyway and low and behold there were three set screws prutuding out about 1/16 of an inch. Replacement was easy.
Now the real problem. Once the rudder was laying on the sawhorses I noticed sever anerobic corrision present on the rudder post where the post goes through the hull and into the bearing and where the rudder post sits atop the rudder shoe. The worst (and hardest to fix) was at the rudder shafthead. What started out as a 1 1/2 inch bronze shaft ended up about 1 inch once all the corrosion was removed. I fixed it (hopfully) by excavating into the rudder about 2 inchs to expose the shaft and had the machine shop (its great knowing well diversified people) make me a bronze coupling (2 inch OD by 5 inchs long) which slide down over the shaft into the excavation and high enough onto the shaft to completly cover the corrodied area. I filled the shaft void with Belzona 1111 supermetal (great stuff) before sliding the coupling on. Once the Belzona set up, I believe the repair is solid. Now the rudder post which protrudes into the rudder shoe. I had to cut off the bottom 1 inch of the post due to again anerobic corrision. This was somewhat easier to fix. Excavated up into the rudder about 4 inch to expose the post. Had another bronze coupling made to slide up onto the post and the other end necked down so it would slide into the rudder shoe. After all this I was wonder about the inside of the rudder itself. I was concerned with any attachment welds inside the rudder which may be cracked. I ended up taking the rudder to the hospital (no not a rudder hospital, more friends) to have it x-rayed. What I found out surprised me. The rudder post is a solid run of 1 1/2 inch bronze rod (I have pictures to prove it). This was good news for me.
Date: Tue Jun 8, 1999 1:43 pm
I rebuilt Spirit's rudder two years ago around original bronze shaft/armature, to which we welded additional rod reinforcements, using foam core and redesigning shape, squaring off the trailing edge of original 'barn door' and dropping that area down lower, so we ended up with something like the 'constellation' shape recommended by PS with the total rudder area the same as originally designed. The rudder is much lighter, but the boat's as hard-mouthed as ever. The one thing I'd suggest is to use plenty of 5200 when rebedding the shoe: Spirit leaked badly through the bolt holes the first time we re-hung the rudder. (The hull construction in the aft end of the keel has been problematic all along--full of voids in the lay-up.)
Date: Wed Jun 9, 1999 12:54 pm
You should communicate these measurements to the website, if possible.
|
|
|
I was wondering if you remembered how the interior of your rudder looked when you had it "x-rayed" by your hospital friends back in '99! Are there some kind of flat bars welded or bolted in some way to the post and then extended laterally out to the end of the rudder? I've got to rebuild mine (113k) because of what I suspect is freeze damage and resulting cracks along the after edge. The sides aren't fair anymore. Thanks for any input on this... Date: Fri Mar 2, 2001 9:04 pm Do you have a manual for the boat? My rudder was cracking along the seam where the two halves go together. I glassed over it with fiberglass tape the 1st year we owned the boat. However, later I noticed in the manual that the rudder is composed of 2 pieces of solid fiberglass laminated together and supposedly such cracking is only a cosmetic separation of the gelcoat. The manual suggested filling the crack with gelcoat. Your boat is newer than mine, but you wouldn't think they would change the rudder design. Date: Sun Mar 4, 2001 8:51 pm We have #129, our rudder shaft comes through a common stuffing box with adjustment. It has never leaked . The vessel had a knock knock noise in large following seas when first purchased. At haul out, we found about 1/8" play at the bottom, at the heel gudgeon. We removed the rudder and had a machine shop machine a new cone out of a hard plastic material and its been flawless for over 10 years. Date: Sun Mar 4, 2001 9:11 pm My rudder had the same cosmetic cracks fore and aft, and we just regelled. A year later, in the "16Oct96" storm which ravaged LI sound marinas on the Connecticut and New Yrok coasts, Pianissimo landed with 3 other yachts across Milton (Rye) Harbor on a flat grassy spit between two rocky islands which were festooned with pieces of other, less fortunate yachts (17 yachts foundered or broke anchors at American Yacht Club alone, only 5 were not total losses). The rudder was partly buried in firm sandysilt on the other side of the spit (lucky the boat did not cross it entirely as the next coast on the mainland is all rock), and was cracked when the vultures of SeaTow tried to "salvage" the boat at midnight despite our having posted it as "Reclaimed by owner, do not touch". [They did more damage than the storm (broke a cleat, wrecked the stoboom sail track at the top when they pulled on the topping lift, etc.), and the insurance company sued them for the very 21000$ they paid me in all...] Back to the rudder, we dismounted it, opened it, and found unreinforced resin filling the void, cracked even more than the cover since it has no flexibility. The post and stainless flange were in good shape, so we just created a shape with slabs of Klegecell, a closed cell polyurethane foam with high compression modulus, a French product I had used for load-bearing insulation on methane carriers in an earlier incarnation, before I came to the States. I do not remember the exact design of the inside struts, and will check with the yard (I was travelling when they opened the rudder and when they finished the job). One advantage of the new rudder is that, due to the foam, it is stronger and much lighter than the original. It has served well in half of the perfect storm (running with 65kts wind, 12m waves for 30 hours), and through a year aroud the Bermuda High. Feel free to speak of Pianissimo's replacement rudder made in the 1996-97 winter, with Paul Muenzinger at Brewer's Post Road Boat Yard, Mamaroneck NY, Tel 914 698 0295, Fax 6305. Date: Tue Mar 6, 2001 7:33 pm I was quite surprised when I found out that my rudder was a continuous piece of 1 1/2" bronze rod with no welded bars attached. I assume it was heated and bent to accompadate for the propeller. My rudder also was coming apart at the seams in some places. I excaved to sound material and re-faired. Date: Sun May 6, 2001 11:21 am While putting the finishing touches on my bottom, prior to a May 8 launching, I noticed a vertical crack in the lower leading edge of my rudder. I can come up with a method to repair the crack, but a closer examination reveled that the rudder shaft is only into the shoe on the trailing edge of the keel by about an 1/8 of an inch. I am now planning to remove the rudder and do what is necessary to make it right. The thought not being able to steer is scary. Any information regarding the construction of the rudder of method of repair will be greatly appreciated. Date: Tue May 8, 2001 10:26 am Our Ketch "Talisman" had a thump, thump sound during strong following seas when we first purchased her. After hauling we found that the bronze rod that inserts into the gudgeon (shoe) was affected by corrosion and worn away to a short stub. We removed the rudder ourselves and transported it to a machine shop in Florida at Pine Island. Here the owner an excellent machinist cut back the bad material and fastened a new bushing out of a very hard plastic material. This was then inserted over the good bronze material and we now had a new stud. We have used this now for some 10 years with no new corrosion and its been wonderful. If you need further info, advise. Date: Tue May 8, 2001 7:31 pm I also had the same problem. I did likewise with my rudder execpt I cut back about 1 inch on the 1 1/2" bronze rod, had a machinist friend make a bronze coupling that slide over the outside of the existing 1 1/2" rod about 3 inches up, necked down to a 7/8" post that insereted into the bronze shoe. Its been 2 years sense repairs and still looks good.
|
5/20/01
The process of removing the rudder was a challenge.
The bolts that hold the shoe the rudder rest on, came out easy.
I removed the packing nut and packing and found that the packing gland tube was frozen to the rudder shaft. I tried heat and a lot of hammering to no avail. At the advice of the local marine mechanic, I used a dremmel tool with cut off discs to grind a slot the length of the packing gland tube, being careful not to cut into the rudder shaft. When I thought the slot was deep enough I finished the job with hammer and chisel. I don't know how long it was frozen, but the packing gland connecting hose was turning on the rudder shaft log when the rudder was turned. Fortunately there was no great amount of wear to the shaft log. No problem with the rest of the disassembly process. DIGGING THE 3' DEEP HOLE TO GET THE RUDDER OUT GAVE ME A BACKACHE INSTEAD OF A HEADACHE.
Common sense dictated that I should replace the rudder shaft cutless bearing. I could not locate any set screws, although I was sure they were there somewhere. Again at the advice of the mechanic, I decided to saw slots the length of bearing. The mechanic loaned me his special hack saw designed for this job. I sawed the slots one on each side and one facing aft, being careful not to saw into the shaft log. I could not saw the slots all the way without cutting into the shaft log at the top where the hose attaches. I went as deep as I dared and resorted to my 3 lb. hammer. I found a 5' pipe slightly smaller in dia. then the inside dia. of the shaft log. I placed the pipe through the emergency tiller access opening into the shaft log and a few good wacks with the hammer drove out the cutless bearing. DISASSEMBLY COMPLETED!!
I cut away the bottom of the rudder to expose the rudder shaft and cut off about 3/4" of the shaft that was affected by electrolysis. I had a shaft extension made from 2" dia. propeller shaft stainless. The rudder is at the fiberglass shop being repaired.
I am going to replace the rudder packing gland with a PYI dripless shaft seal, a bit pricy but should eliminate any future problems.
ANYONE THAT DOSN'T HAVE A ZINC ON THE RUDDER SHOE, SHOULD INSTALL ONE. IT WILL PROBABLY ELIMINATE THE PROBLEM I AM HAVING.
Fancy Free #87
======================
I also had the same problem. I did likewise with my rudder execpt I cut back about 1 inch on the 1 1/2" bronze rod, had a machinist friend make a bronze coupling that slide over the outside of the existing 1 1/2" rod about 3 inches up, necked down to a 7/8" post that insereted into the bronze shoe.
Its been 2 years sense repairs and still looks good.
Rick
003K
=====================
5/8/01
Our Ketch "Talisman" had a thump, thump sound during strong following seas when we first purchased her. After hauling we found that the bronze rod that inserts into the gudgeon (shoe) was affected by corrosion and worn away to a short stub. We removed the rudder ourselves and transported it to a machine shop in Florida at Pine Island. Here the owner an excellent machinist cut back the bad material and fastened a new bushing out of a very hard plastic material. This was then inserted over the good bronze material and we now had a new stud. We have used this
now for some 10 years with no new corrosion and its been wonderful. If you need further info, advise.
Don and Brenda
======================
Date: Tue May 8, 2001 7:31 pm
I also had the same problem. I did likewise with my rudder execpt I cut back
about 1 inch on the 1 1/2" bronze rod, had a machinist friend make a bronze
coupling that slide over the outside of the existing 1 1/2" rod about 3
inches up, necked down to a 7/8" post that insereted into the bronze shoe.
Its been 2 years sense repairs and still looks good.
1550 Feb 14, 2002
Captains,
I am writing to inquire about the bronze foot at the bottom of the keel that holds the rudder shaft. At the end of this season I noticed that the zinc collar that I normally install on the propeller shaft corroded faster than had been the case in the past. Also, the bronze foot that holds the rudder shaft had some pinkish color to it (like when bronze corrodes by losing its zinc.
On my boat all through hull fittings are electrically bonded to one place on the inside of the hull. This terminal is attached to an external bronze plate (I think it is about 6"x8" approximately) and so is also acting as a lightning ground.
Now the reason I am writing is to find out what anyone knows about that bronze foot that receives the rudder post and what you do about sacrificial zincs. In the past I have used one zinc collar on the rudder shaft and up here in L.I.Sound that would be adequate for the season. Going up and down the ICW zincs went much faster. I don�t know that there is a correlation with corrosion rate and location. Do you use more in the way of sacrificial zinc than I do and if so where do you mount them and how?
1555 Feb 15, 2002
Phill,
On our vessel, the bronze casting you refer to does have a large flat oval zinc mounted on the side. We replace this zinc every time we haul out for bottom painting which is once every 4 years. We replace the shaft zinc at the same time. These zinc seem to last at least that length of time. We use the vessel year round, so likely we use up the zincs faster than others. Ps. Mr. Weaver has it right!! That which he pointed out we also had, that is, some corrosion when we first purchased the vessel. We cut about �" off the outside of the bronze shaft at its lower end, had a machine shop manufacture a hard plastic bushing and sleeve combination which was epoxied over the shaft and the shaft inserted into a sleeve. This has been perfect now for over 14 years. No evidence of corrosion has been found since.
Don Bundy
1556 Feb 16, 2002
Don,
After a season in the water I have always exhausted the zinc collar on the prop shaft. The "large flat zinc" that is mounted on the side of your shoe: is it something you purchase from Boat/US or West Marine? How is it held to the shoe? Is the shoe drilled and tapped for bolts that hold the zinc to it? Are the bolts stainless or bronze? Any info you can provide will be appreciated.
The discoloration I see on OHM SHANTI�s shoe is at the top where the shoe meets the hull and at the very bottom.
Phil
1557 Feb 17, 2002
Phill,
The zincs can be purchased at just about any marine supplier. They are shaped like a flying saucer along with a bolt in the center of the saucer. The bolt is not bronze but stainless and uses an allen head type wrench.
You indicate that your shaft zinc lasts only one season. This would give me some worry as I believe it indicates some galvanic action. Ours lasts four years and could go another year easily when we replace it.
Don
1558 Feb 17, 2002
Phill,
The zinc we refer to can be purchased at any marine supplier. The bronze shoe is drilled and tapped on the starboard side to fit the saucer shaped or disc shaped 3" diameter zinc on the side of the shoe without any of the zinc sticking out beyond the shoe.
Our zinc lasts over 4 years as that is the interval we haulout. You indicate your shaft zinc lasts only one season. This would give me some concern as it seems to indicate some galvanic action taking place. You might want to look into why it lasts such a short time before any damage is done.
Don Bundy