Date: Sat Jun 17, 2000 10:19 am
Spirit's on the hard because I've been rebuilding the head compartment all spring. The plywood floor beneath the shower pan as well as the saloon-side door jamb and the forward compression post from the floor up to the top of the jamb were soaking wet and terribly rotted. Our shower pans are disasters waiting to happen! I've rebuilt without a (virtually useless, for 6+ footers like us'n) shower or pan, replacing the shower pan with a 23" Bowmar deck hatch. This makes a solid sole and gives full access to the forward bilge--great for storm anchors etc and to air out the compression post bases: veritably, the Grail of SW II owners! (Oh, yes: we always ship a 6 gal sunshower.)
Date: Tue Aug 1, 2000 12:01 pm
As owners of serial #129, also a ketch, suggest that while at restoration you cut an access panel within the sole of the head so that you can check on the condition of the oak support column for the mast, this area can develop wood rot and any additional air flow can also be helpful. We treat our oak column annually to prevent any wood rot from starting. By creating an opening you will find additional storage that we use for carrying wine, or water, some 22 liters worth.
Date: Thu Aug 3, 2000 10:17 am
I concur with airing out the head undersole and would like to put in (and get?) more details, after a year sail around the Atlantic.
I opened a water tight (6" o-ring and screw in cap) port hole on the sole forward so I could inspect and put my forearm. It also became and access for a manual bilge pump and a sponge, as the offshore combination of (a) heavy rain/green seawater leaking in from stanchion, chainplate, deckjoint and chain locker(any more knowledgeable input from readers?) with (b) a clogged drain hole (if any such hole is extant) on the aft bulkhead unreachable by forearm, leads to water accumulation after heavy or rainy weather, which accumulation should not be allowed for any substantial length of time. That was progress, but still a drag, so I am turning to Don and the Seawind owner who put in a full size hatch cover on his head sole (per earlier ms while I was offshore) to ask:: 1. What is the preferred product(s) to "treat" annually the foot of the column? 2. In order to reach fully around the column, to better scoop out accumulated water (sponging is slow and uncomfortable), and to inspect and unclogg or reconstruct a drain to the bilge under the sole and around the water tank, a larger hole in the head floor or almost complete removal would help. Why not leave it open rather than add an expensive hatch under the teak grating? Aeration would be permanent, and emptying and drying in need would be a breeze. Showers are best taken on deck (with a simple hose extension) or in the cockpit behind spray panels (leeclothes?) if privacy is a consideration, via hose extension from the kitchen sink tap. 3. Is there actually a drain hole a the foot of the aft bulkhead? If not, is there a best position for one, or does the glassed-in stainless steel water tank prevent any meaningful path from (a) a point if that bulkhead foot close to the ship's centerline (lowest under the current floor) to (b) the bilge well under the engine? Date: Fri Aug 4, 2000 2:08 pm
As owners of #129, our head contains a removable teak grate and below that a containment area made of fiberglass with a small drain. A separate sump pump with strainer discharges the shower water overboard. What I did: After removing the teak grate, I carefully cut a circular hole of either 6 or 8 inch diameter, removed the plug and found the area below to be full of water. We pumped out the water, sponged out the rest and then located a small hole approximate 1/2 inch diameter. Looked like plastic tubing. In this I shoved a stiff wire which lead aft and came out below the SS water tank within the aft deep bilge. Now that the line is clear of debries the forward area will drain into the aft bilge. We then installed a plastic port, commonly available which one can see through. Our CG in this area wants to see into every little hole or access area. This made the containment area waterproof for the shower use. To protect the oak support we use a commonly used material for preserving wood outdoors, available at most hardware suppliers. When the boats at our wharf we take out the round port to permit air circulation, and when at sea we use the area below for extra storage. We prefer not to shower in the cockpit simply because here in Florida it conveys an appearance that nearby residents, condos, etc. do not want to see and this works against boating in general. Date: Sat Aug 5, 2000 1:03 pm
In brief, re. ASIIc SPIRIT (#119): I tore out all teak paneling in the head as well as the commode shelf. I also took out the shower pan entirely (a piece of work, that!). All the wood as well as the plywood sub-floor were like wet sponges. I then rebuilt and refinished the whole works, without any shower or sump pump. I glassed in cleats under both doors, along the main bulk-head (dividing the head from the salon), and across the (now, bare) hull. I did this heavily: the cleats add stiffening lost in removing the shower pan and in cutting through 2 supporting knees below the sub-floor. (The tolerances must be carefully thought-through and executed.) Then I installed a Bowmar 23x11" deck hatch on the cleats. The hatch is sealed by two stout dogs and made of water-tight, very tough and well-reinforced white plastic. It cost something like $45 at West Marine. I installed an entirely new bench for the toilet of solid 2x walnut (an old kitchen counter), the front, under the commode, left open for access to fastenings and to the feed hose. Finally, I finished the space between the outboard cleat and the steeply-rising hull with glass-thickened filler and, finally, faring compound, so as to make a continuous curve from the inside of the hull to the hatch, with no sqaure corners for water to collect in. I then painted everything with high-alclyd white latex paint. It was a big job and took several weekends, but the results are quite nice. Three years ago, long before I did all of this, I'd installed a 7" round deck plate in the shower pan. This allowed me to inspect the aft compression post visually and to air out the space, but it was inadequate. The new hatch opens fully an entirely new, very large, low locker over the keel, a'midships, perfect for the storm anchor and chain, etc., which fit through the hatch easily. The pan had to come out because of the rot along its sides, and one threshold--the salon side--had to be rebuilt entire. The new hatch gives easy access to the forward compression post (remember, there are two!) and, opened, gives real air circulation. Personally, I would not leave in the parts of the pans that support the teak grate because these are, in fact, the most problematic parts in terms of the rot they cause. Also, I wanted an opening that could be positively secured, in case of a knockdown. (We're prepping SPIRIT for long-term ocean passage-making.) The grate, cut down, is now a duckboard in our shoreside kitchen sink. Everybody's happy. There are many details to this kind of rebuild--get in touch if you'd like some tips. (I found myself thinking for half an hour before every five minutes of actual work.) I haven't used anti-rot dope on the bases of the oak posts because they aren't rotten. I'd probably use "red lead" paint if I used anything. I did need to use that famous two part liquid filler whose name I forget (Git' Rot?) high on the forward compression post where the rotted threshold behind the shower pan had affected the post: it all seems ship-shape and soilid now. We never used the shower but the previous owners obviously did and Jorunn and I have customarily sluiced down the head with seawater when swabbing it, thinking that the sump pump would take care of the excess. It didn't. We're Sunshower types, which provides the children on neighboring boats in anchorages a source of amusement and delight. We're happy to oblige, and I'm always happy to get complicated stuff that entails plumbing and wiring off the boat. Date: Thu Nov 30, 2000 1:20 pm
1. Mast post: I support everything Doug said with the exception of the 6-8" hole to access the mast post: I would simply cut out the flat part of the head sole except for a 2-3' rim for structural purposes (if it has any). One owner has inserted a Bowmar hatch in such a hole, but I do not see the need, as the teak grating fits firmly above the sole and hole. I intend to do that very cut this winter based on the following experience: I fitted as part of my upgrading for offshore a 6" o-ringed port on the head sole, an inch away from the mast post. I found the post foot was in good shape, but strong rains and heavy spray will find their way through chain plates or other deck leak(s) I have not fully worked out. I had 1-4" of water accumulating under the head sole after every wet rain or passage. So, back to porthole, 6" was to small to (a) look on the aft bulkhead to identify and reach the clogged drain hole (if any extant!) toward the bilge, (b) to conveniently sponge off after draining with manual bilge pump (my shower pump had recurrent problems), and (c) to inspect the port side of the post or other drainholes, fore or aft. There is no known drawback to opening entirely the sole (except for a possible 2-3" rim if it has any structural purpose), and you gain some storage space for bottles. It is also cheaper, easier and cleaner than fitting any port cover or hatch. By the way, I never used the inside shower, preferring to shower either on the foredeck (flexible connection permanent on the former shower head), or more rarely in the cockpit (flexible moved to kitchen sink tap, or from a solar heated plastic bag shower hanging on the boom). This avoids gray, soapy and hairy water in the shower sump or ultimately in the bilge.
Date: Thursday, November 30, 2000 1:57 PM
I tried a 7" port through the showerpan first, too, then realized the whole plywood under-sole was rotted and tore out the entire shower pan (as well as the [useless] shower). If you get into this, you'll find that the shower pan assembly entire is thick and stiff and that there are two glassed in light knees under it: I interpreted this to mean that the pan served to stiffen that hull station. I tore out the entire pan also because a lot of shower water had gotten behind the vertical flanges around the edges and wood was rotting behind them, unseen. I restiffened the station by using 5200 and bolts to attach 2x2" hardwood cleats around fore, aft, and inboard sides of the gaping hole, a heavily glassed in cleat shaped to fit hull contours outboard and then 5200'd and screwed a 23" Bowmar hatch on top of these cleats (gaining about 2" headroom). Voila--a sound, stiff sole, a sec ure hatch, and great access. You're absolutely right that there's a huge bilge locker waiting under those shower pans--and that the bigger hatch makes it far easier to inspect/work on both compression posts--but I would neither leave the rim of the old pan in place (because of the potential for hidden wood rot) nor trust to the teak duckboard that fits it to secure the new locker. In a knockdown, stowed bottles would knock the grate aside like a feather, and a storm-anchor stowed in the (perfect) new bilge locker would raise holy hell if gone adrift--smashing the porcelain commode on its way out into the accomodations and proceding from there. Finally (and this from experience), if the bilge is not closed tightly with a sealed hatch the head will be very hard to clean without slopping water through the grate and into the bilge (not to mention men's dribbles, which would also end up in the open blige and soon stink up the compartment). In lieu of the teak grate (whose support I took out), I now use four squares of plastic deck mat that cover the hatch cover and surrounds, wall-to-wall, and also can be easily removed to open the hatch or to clean. The old grate, cut down, is now a handsome duckboard in our very deep onshore kitchen sink. Everybody's happy.
Date: Sun Mar 25, 2001 8:20 am
Thanks for sharing. As a long time technical teacher, I think one of the worst assumptions is that "everyone" knows something. I added your comments about the limber holes to the knowledge base along with a vague recollection that I had. Upon further inspection of my mini hole in the head sole, I found that I too need to pull out the entire area. I still haven't finalized my ideas about the restoration of the sole. With three daughters and a wife who value their privacy during a shower, the one thing I know for sure is that the shower pan will have to be replaced. Both the hatch and the Lexan cover ideas have merit because they allow a larger access. The 6-8 inch hatch seems to be workable but is very limited.
Date: Sun Mar 25, 2001 12:18 pm
Now that we are a number trying to open up the head sole in a bigger way, could those (Jack et al.) who have done it comment on the best way to saw that thick composite. I was thinking of a 1+" whole say in the 4 coreners of the trapezoid and then battling in bewteen with various saws.
Also, how far can you go on the aft cut without hitting the shower pump suction cup? Or is the best way to remove the whole thing and invert the suction (turn it to the bottom) so that it becomes an added, intermediate bilge pump.
Date: Mon Mar 26, 2001 12:11 pm
I cut the head sole using a circular saw and sabre saw. Be warned that the hull curves sharply inward so there's risk of going into that if you're not super careful!
I drilled four 3/8" holes in the corners to allow the sabre saw to turn. That worked OK. Because the sole is so hard (1" ply with some glass over the top) it's slow going.
There's two cross-beams. One is just 4 inches or so aft of the forward head door. My hole goes not quite to that beam. The other is in the way - I cut right through it. It's about halfway between the forward door and the aft head bulkhead, and extends about half way into the head.
I stopped my hole about 3 inches short of the show suction. The widest part of that is the drain cover that's on top. As I have two kids, one a 13 yr old who is starting to be very concerned about his appearance, I'm keeping the shower operating, so left the suction where it is. The pump failed last summer so I replaced that as well.
Date: Sat Mar 31, 2001 4:57 pm
I found only 1 cross-stiffener under it, not two, and that one is an inch aft of the sole center.
I have not attacked the sole yet, as I ponder the argument that some people prefer to shower in private rather than on deck, which would oblige me to keep the new sole trap watertight. I had planned to simply drill 4 holes and cut from one to another obliquely (self-supporting trap door), then hinge the head side and lug the opposite side parallel to the ship's centerline. I can make the straight joints reasonably watertight, but had planned to leave the corner holes open for simplicity and ventilation.Any idea that does not require a fancy hatch cover?
How important is it to keep the integrity of the cross-stiffener? Given the thickness of the sole, and the teak grid above it, it does not seem necessary, but can be restored with a bar epoxied on each of the two stumps, and crossing the newly open hatch. A 2-3" rim left on the headside (useful to prevent cutting into the hull below) and 1.5-2.5" on the cabin side should take care of whatever structural function that sole may have.
Date: Fri May 18, 2001 1:44 am
I still have only an awkward inspection 6' porthole in the head/lieu sole. I have not yet cut out as planned after reading about the Bowmar hatch cover, because I'd like the dimensions to allow for such a cover, and I have not found in any of my Buyers' Guides or manufacturers websites any standard cover, from Bowmar or other, that is not much too large, even the 7"x14".
COULD ANYONE THAT HAS OPENED UP THE SOLE AND FITTED A TIGHT COVER GIVE ME DIMENSIONS AND SOURCE, as well as TIGHTNESS EXPERIENCE over time?
Date: Monday, June 25, 2001 2:08 PM I've been busy on the vessel but now I come to the part where I need the assistance of the assoc.I would like to install a shower and I've seen some nice molded sumps on other seawinds I am assuming they were installed when new.Where would a person obtain one of these?
Date: Mon Jun 25, 2001 8:48 pm
I just took out the shower sump so that I could reach the compression post. It looks to me that it was laid up fiberglass on marine ply. I'm going to install two supports for the pan using 1" x 3/4" marine ply and then fiberglass it. I'm also looking to see if I can put in an access hatch and still leave room for the drain. I'll publish drawings when the project is complete.
Date: Tue Jun 26, 2001 5:54 am
I have the same arrangement as Howard, and am currently stumped in opening the shower sole (same as Howard's), if I insist on a watertight hatch cover. smallest I found is 7x14" which is too big. make sure that your new construction allows full access to a and b below.
As anyone found something tight and better than a couple of 6" portholes, for full access to (a) the mast post and (b) the aft limber holes (which are hard plugged and need serious reaming)??? A couple of people have mentioned success in the past, but they seem to be sailing as they have not answered my query of last month.
Date: Tue Jun 26, 2001 8:05 am
We used a long green coated wire (purchased at Radio Shack) to force through the small opening which lies directly under the sole area just inboard of the head area and slightly aft on our vessel. Once a year we force it through (it drains into the deep bilge area) to be certain its open. We also cut a round hole in the head pan and installed (an 8 inch round opening cover) This we keep open for air circulation to ensure the wood support post does not rot. Also we coat the wood support post with a preservative each year. So far this system has prevented any rot and the post is solid and hard. We also use the area, below the sole forward of the water tank, for storage of wine when going on long voyages. We can store 22 litres of wine here and because the wine is heavy it seems the right place for it to be. As we use the wine up we continue to store the empty bottles (plastic) in the area making disposal no problem even though its plastic. We bring them home for disposal. Now how many vessels come equipped with a wine celler? Only the Seawind II. Date: Tue Jun 26, 2001 5:45 pm
Can you provide more detail on the location of your access hatch for the compression post? I am going to try and imitate what you did after the boat comes out of the water for the winter, but I am worried that I will cut through something I shouldn't.
Date: Mon Jul 30, 2001 1:13 pm
I am trying to open the head/shower sole (which is what Don and Brenda did, and others, I believe), and not the cabin sole in way of the head. The thickness there is still pretty large (a sandwich with plywood core), and there is a crossbeam stiffener which makes it even more of a chore cutting out. and I have not found yet a source for a small enough hatch that would not be a simple 6 or 8" porthole, which provides less convenient access to purge the limber holes and hoses (which run along the water tank to the bilde aft), clean and use the space for storing wine et al.
So am still hoping to hear exact dimensions and fitting source(s) from the one(s) who have successfully opened that head/shower sole to fit a water tight hatch cover.
Sent: Wednesday, August 15, 2001 8:38 AM
Also the shower drain is missing in my head. I believe that it was sealed up after the compression post underneath was repaired years ago. I would like to find a way to reinstall it and make the shower functional again.
By all means, keep the shower head decommissioned and fit a plastic hose with shower head instead, with which you can shower on the forecastle and rince the foredeck and stay swagings. Make it fit the kitchen tap end (small adapter) and you can shower in the cockpit for more privacy and spray the aft stays. then open the shower sole and work on your limber holes and make sure the mast post stays dry...
Date: Mon Aug 20, 2001 2:43 pm
As I write we are just finishing the new shower drain arrangement.
Previously I had fitted a pump in the vanity to remove water from the shower. I had considered for quite a while using one of the two commercially available shower sumps. Both arrangements seem quite adequate save for the constant need to strain the waste of hair and soap film from entering and damaging the pump. The accumulation is rapid and amazing. I for one found it an untimely and very distasteful chore and all too often found the drain needed cleaning just after a much needed shower.
We have just removed the original drain fitting (located aft & inboard in the pan) that was fitted to a 1/2" hose and replaced it with an 1 1/2" standard stainless steel bar sink drain fitting that incorporates a sturdy, removable waste basket within the body. We fitted a standard 1 1/2" bilge pump hose to it and fished it through the space between the water tank and the hull on the starboard side. It exits into the engine compartment and the strained waste can either be discharged to the bilge for removal or into the new, triple purpose macerator pump. This pump serves to drain the galley sink while grinding up the inevitable food waste. Secondly, by fitting a check valve into the drain line and a Tee fitting, the refrigerator also drains and discharges through a thru-hull fitting in the transom, Further fittings can easily accommodate the shower drain into the same multi-purpose pump.
I had previously installed a Beckson, 8" inspection port in the drain pan for access and inspection of the compression post and servicing the hose clamp one the drain.
During the refit we were to find that the sill plate under the fwd head door had rotted out badly. It has been replaced. The trace of the course of water that had been responsible was the shower drainage that found its way across the head mounting platform. The original molding actually channeled water both fwd and aft. to eliminate this problem we devised a very unique repair. The first part was to replace the head support platform. Fairly easy to do.
For $28.00 we purchased a sheet of Fiberglass Reinforced Plastic (FRP), formed a template of a one piece, full-width sheet that fits from just under the shelf of the outboard locker to the edge of the support platform. Using a 403 thickened paste of West Epoxy and some creative, temporary bracing "glued" it in place. All accumulated water will now be direct to the pan and be prevented from entering any of the surrounding joinery. The unattractive section of the hull below the locker face and the joint between the platform and the hull is covered quite attractively with a very fair curve.
Date: Thu Sep 6, 2001 11:14 pm
I have some of these problems, and the only way I can think of, besides carefully rebedding the deck fittings, is to open the head sole and clean out the limber holes forward and aft, and the tubes that are supposed to lead water from the aft holes to the bilge, along the SS water tank under the cabin.
I have made a first try, by opening a 6" porthole on the foward part of the sole, so I can inspect the mast post foot, and keep it dry. But every rain translates into a need to drain, so I shall open the sole more radically (an inch thick of plywood laminate... and very close to the hull towards the head bowl), and permanently give up showering inside. I have not used inside showers for 2 years anyway, finding that a deck shower (through the fwd) hatch works very well and desalts bodies before they enter cockpit or cabin. Another shower can be fitted to the kitchen tap for those who prefer the cockpit's privacy (especially if you have leecloth panels arounf the cockpit).
I have given up finfing a tight hatch cover of the dimensiuons that can fit a hole in that head sole, sufficient for good access to both the mast post and the limber holes on the aft bulkhead. On a side note, one of us uses that space for wine/booze bottles...
Date: Mon Oct 15, 2001 7:32 am
This weekend I was cleaning the shower sole when I noticed a three inch crack running fore and aft. How should I repair this? Can a new one be molded as a replacement? It seems to be made of the same kind of plastic found in household showers.
Date: Mon Oct 15, 2001 11:24 am
Our shower stall is made of plywood over supports, this is then fiberglassed with a lip running up about 5 inches all around with a drain. Its a simple arrangement, which from a maintenance point simply needs a coat of epoxy paint once every two years. We use the shower head to wash out the area, and turn on the drain pump which pumps the water through a filter and overboard.
Feb 28, 2002 6:36pm
If memory serves me correctly, the consensus is that the 8" hole does not get the job done. Check the bilge, shower pan, and cabin sole entries in the Knowledge Base. If I have some time this weekend, I'll check my files to see if more info may be added to those files.
I'm still working on mine (the compression post did need rebuilding) and I wound up making rather large openings in the cabin sole as well as the shower pan. I'll post the info when the job is completed. I used a Sawzall and a jigsaw with the blade shortened to prevent cutting the hull. Although the hull is protected, it does create quite a challenge and potential hazard (hear that any legal wienies) to ensure that you don't bend the blade, break it or have it jump out of the cut.
Feb 28, 2002 3:55pm
I recently cut out my shower pan. I used a Roto-Zip tool, that is a small router type tool. The depth of cut is adjustable allowing you to cut a little bit at a time until you cut through. I didn't even touch the top of the port to stbd. stringer that is about in the center of the shower pan. I cut a hole about 4" by 6". Now I can see where to cut, to have an access opening as large as possible.
Feb 28, 2002 4:46pm
James, When I cut the shower pan for the access port I used a saber saw and then filed and trimmed to dimension.
The hatch that I cut in the cabin sole, just outside of the head door, proved to provide more (additional) access to that area and has been most helpful in both the compression post repair as well as the periodic cleansing of that forward bilge... So much so, that recently we installed an 1 1/2" dia. sink drain (bar sink with removable debris basket) to replace the original 1/2" unit and a 90 degree elbow for the shower drain. By the way, there is room enough between the water tank and the hull to starboard to snake an 1 1/2" sanitary hose back to the bilge sump.
Save your money on a hole saw that you'll use maybe once!
Feb 28, 2002 5:44pm
I have been looking at that shower sole for a year, and thinking out what I can do, after finding no ready-made hatchlet that will fit my needs which are, in order of priority:
My initial thinking was to drill 4 corner holes with whatever hole saw I have, and cut the sides of the hole with a circular saw, beveling so that the cover or grating I would make of teak or other would be self-supporting, and also to reduce the chances to nick the hull which is very close on the side farthest to center. I have dilly-dallied because of that very risk, because it is a tough job given the thickness of the sole especially at the stiffener, and also because I have not yet completely despaired of finding the right hatch cover that would allow keeping the sole reasonably water tight.
The alternative to the latter, to which I am almost resigned, is to eliminate the inside shower: I and crew already shower on deck from a longer hose that goes through the fwd hatch (New York law now allows disrobing on the water side except for zoning laws, but there are no such off the beach), or in the cockpit for the less shameless, using a hose tapping on the kitchen sink tap (extremely infrequent). But you need to be hardy on certain off-season evenings, in April-May or Nov-Dec, even in balmy LI Sound or Chesapeake...
I now have another excuse, and shall investigate the Roto-Zip approach which seems attractively prudent...
Best luck, and thanks for bringing up again an excellent subject. Keep us
abreast! Bert dF, Pianissimo 80K
Feb 28, 2002 6:41pm
Firstly, I would like to thank my fellow SW II owners for their advice and revelations (Cava Bert? I wouldn't mind tasting some wine myself. I like bordeaux and merlot)
I stepped on the shower pan with the teak grate out a few months ago and cracked it (about 3 in. long). I might go ahead and cut that section out. One of the previous owners mentioned in one of the earlier newsletters that rotten wood beneath the sole had been replaced a good while back. I can only assume that it was the compression post given the fact that my rig is in good standing. However no inspection ports were made. I noticed that the original shower pan drain holes were plugged with silicone. I will probably hold off on any major cutting until I get my other projects finished, but I would like to get my shower functional again. If I cut an inspection port where the crack is (a few inches aft of the forward bulkhead
and slightly starboard off center), I might be able to allow myself enough access to install the drain and hose that Paul used. I can use my newly-acquired jigsaw and spend that 323.00 on something else, perhaps some good wine, no?
Feb 28, 2002 9:56pm
Any porthole fwd of the middle will be barred from access (and even line of sight visibility) to the aft bulkhead by the transverse stiffener. since this is temporary, make sure you are close enough to the mast post to touch it and check its soundness, and make the porthole big enough to pass a hand plus a sponge without squeezing the sponge so you can extract water...
Feb 28, 2002 9:47pm
I used a sabre saw with a blade to cut through the 3/4" plywood, that's all you need to accomplish the job.
Don Bundy
Mar 1, 2002 9:02pm
Yes it can rot! likely since you had a access enough air circulated and prevented it from rotting. In a wet, and warm, stagnant air environment mold, and mildew can get into wood and rot is the result.
I treat my compression post once each year with a product that is made for wood posts in the ground to prevent rot.
Mar 1, 2002 9:56pm
Did your boat already have inspection ports in the sole for your compression post or did you cut them yourself? Why boat has no access ports.
James
Mar 2, 2002 3:03pm
I cut the hole in the floor of the head shower pan because at the time the Coast Guard was cutting, chopping, and sawing anything they could not see, so I cut the hole 8" diameter and found the hull full of water forward of the watertank. Next I located the drain, which was plugged, routed it out and the water drained into the bilge. Thankfully in a few days the bilge was dry and the post was a solid piece of oak.
Mar 3, 2002 9:27am
I have never installed a shower in the head, instead we take cockpit baths using a Sunshower, using about 2 gallons for the two of us, or in very cold weather, a sponge bath (a la Francais) using the galley sink. The shower in the head uses fresh water which is likely to drain to or near the bottom of the head bulkheads. Fresh water is the source of rot, not salt water. And I don't want a rotten head bulkhead or compression post. I do have a drain hole in the head floor (or sole), but only for the rare head overflows.We have been able to preserve what modesty we have by the use of cockpit cushions turned on their side in the cockpit. If we are in a marina we use the marina shower, if any.
Mar 3, 2002 0:39pm
Hear, hear, but I still recommend tapping the existing shower pipe, or the forward sink tap as an alternative to the kitchen tap, with a hose and showerhead long enough to reach, respectively, fwd deck and cockpit. Although you can last weeks healthily on mere "sponge baths" (why the French connection? Or is it too salacious to elaborate?), there is nothing like a sparse but full shower when you come out of a swim, and/or when the engine has heated the water in less balmy climes.
I reserve the tank water for that use (and fresh water dishwashing once a week, the other days use seawater from a separate hand pump, on the other side of the icebox drain pump), having found that 60 days of bottled freshwater (3 times the expected crossing time) can easily be stored in our spacious boats, at least for the crew of two which is the comfortable number offshore, when the fwd V-berth is loaded with need-to-access equipment, charts, sails, etc. Our 50 gal tank thus gives us ample bliss from short showers (if only for rincing after soaping with biodegradable Joy and pre-rincing off the boat), on long voyages and/or when swimming.
Salt water inside the cabin, on body, clothes or walling surfaces, is just a NO-NO: We even wash and dry the dishes in the cockpit when using seawater, to avoid a spills or drops inside. We get everything ready (towels, clothes, showerhead) for people to walk directly to the fwd deck from the ladder, without entering the cokpit after a swim.
Mar 4, 2002 8:36am
Could you tell me the approximate location where you cut the hole? I suppose it would be toward the port and fwd side the pan.
Mar 4, 2002 8:13pm
There are two ribs that run athwartships, the hole must be cut directly in between these to ensure the strength of the sole remains. I will get you the dimensions tomorrow and email them to you.
Jun 15, 2002 11:20am
I will begin cutting soon to put in my 8 in. inspection port and a new shower drain. Are there any hull structures underneath that I have to concern myself about? If I have to, I'll remove the whole thing and build another.
Jun 15, 2002 1:06pm
The only things below the shower pan on my boat were the two knees which were used to support the pan.
Jun 15, 2002 4:30pm
An eight inch inspection port seems large. I have a 4 or 6 inch inspection port outside the entrance door to head and a similar sized one forward of the head, in the centerline of the boat. I would not put in an eight inch sized one because the curvature of the floor will not follow it.
Aug 21, 2004 3:38pm
Alas, I am beginning my repair of a spongy compression post...I'm
thinking of cutting off the butt end of the post about 3 inches or
so below the cabin sole, and fitting a used 1.5" bronse seacock body
and pipe nipple as a new "base". I'm wondering if I can simply use a
bit of bronze threaded pipe in the old seacock with one of those
throw away nuts that come with thru hulls as a "house jack"
arrangement beneath the post for final adjustment. I'll have a piece
of stainless channel made to surround the sides and bottom of the
oak post for the nut to push up on...sound like a plan??
Aug 21, 2004 7:32pm
I would take the mast off first, then measure nthe height of the transwerse beam above the sole floor, then do the substitution of sound material or bronze metal to rotten stuff at the exact same height, using whatever jacking up assist you may concoct.
Since the metal to wood substitution is on a small percentage of the total height, you don't have to adjust for the difference in compression modulus. This is assuming your beam and/or deck has not yet sagged under the mast...
Aug 22, 2004 2:24pm
The compression post deterioration is a common malady of the ASWII. Repairs, however, must be affected with a degree of permanency in mind. Protecting the laminate below the original placement is probably the most important of the missions.
My own solution came after a great deal of thought and was accomplished back in 1993. A description of the process is contained either in the Sea Quill notes found under the owners page or the knowledge page and describes a process that allows the repair without removal of the mast.
All of the original measurements taken after the repair have not changed at all in 11-years.
Tue Mar 29, 2005 0:22pm
Hello everyone. we're in the process of getting to know our ASWII
(Salty Dawg #25) and we are wanting to check the bilge areas to ensure
that there is nothing particularly nasty growing or evolving down
there. Our question is simple (to ask at least): how are the bilges
accessed other than from within the engine room?
If, as we suspect, some folk at least have made good/better access to
the bilges thoughts/advice/experiences would be very welcome.
regards from the UK to all
Mar 29, 2005 0:56pm
The previous owner on my boat, 83C, cut out a circle in the shower
floor. He installed a 10in round hatch which gives
Good access to the area under the shower pan. That area is subject to
water entering and accumulating there. You will want to be able to
access that area to inspect the timbers that comprise the mast
compression system to ensure the wood supports remain dry and rot free.
There is a lot of information about that on the knowledge page of the
allied seawind home page.
Mar 29, 2005 3:44pm
On Wind Ketcher #19, the only access is via one of 3 forms of inverted torture: 1) cramming my head in from the fore side via the engine access way behind the ladder. The engine fluid drip pan allows just enough room to get most of my head through (leaving only one ear behind), 2) & 3) either cockpit locker and with removal of the fore/aft divider - such access allowing only "arms" entry with poor workability.
Suggest having a very strong magnet available on a string to retrieve tools etc. dropped in the bilge - and a telescoping grab pole.
Don't forget the fresh water bilge area under the head sole which immediately surrounds the main compression post and imperils same if moisture is not routinely evacuated and monitored there.
Fair Winds.
Mar 29, 2005 11:20am
Following on with getting water away from the compression post area... this area drains through a molded-in hose that discharges into the deeper bilge sump under the engine. I've found on Windfall (64K) that the regular use of a plumber's snake, from the discharge forward, removes any debris which may be preventing complete draining and drying of the compression post base area. The discharge is glassed to the starboard engine stringer about half way down into the "Black Hole".
Mar 29, 2005 5:45pm
There should be an explanation of this in knowledge base, I know over the last 8 years on the internet, I have given my views on this issue. On Silver Spray we cut a hole in the floor of the head compartment, installed an access port in the head compartment- its about 10 inches in diameter, it is water tight when screwed down. To inspect the forward bilge area, we remove the grate in the head, open the port, and reach in, or pump out whatever. In our boat as in every other Seawind I have seen the drain holes are continually stopped up, the forward bilge must be kept free of water or the post that supports the mast will rot. It's made of oak and has only glass around this first 1/2 inch or so. I know one owner who had to repair the post, he used get-rot and a dental mirror after digging out the soft spots. Not a real satisfactory repair. To properly repair, the mast must be unstepped, the post removed and replace thus requiring removable of bulkheads and sole or parts of each.
We reach the main bilge thru the lockers it requires some contortion to get down, but there is plenty of room once in. We use a magnet to retrieve lost tools and a net for other things.
Our Seawind II is hull 101.
Mar 29, 2005 8:01pm
Years ago, 1985, I cleaned out the drain that leads to the deep bilge area using a plastic coated wire and a cleaner degreaser fluid. This drain has remained dry since, now 2005. I use the space for storing 22 litres of wine when traveling.
Mar 29, 2005 8:05pm
I cut a 8" round hole in the floor of the head, gaining access into the
lower area and which gives me great amount of additional storage for 22
litres of wine. This also allows me to visually inspect the main support
for the mast.
Mar 30, 2005 1:15am
Dear each who have replied and shared thoughts and experiences,
Ok, it sounds as if there's a choice: to get organised and cut an
inspection hatch; or for one of us to make sure we don't gain too much
weight and continue to be able to get into the lockers. Having said that if there is no inspection hatch presumably there's also no inspection of the kingpost. Sounds important that.
Again thanks for the replies and regards to everyone
Mar 30, 2005 8:44am
I agree. My cut was a 6" hole and that is a bit too small. However, unless you intend to maintain a shower stall instead of showering on deck, which avoids polluting the bilge with gray water and ladies hair, I would simply open a large quadrangle, leaving enough falnges around to maintain the strength of the floor, and bevelled so you can use the cutout as a hatch cover. then full access is restored to clean, inspect and store and retrieve those cool bottles.
Mar 30, 2005 0:49pm
The head is not the only place a hatch can be cut to access the
forward bilge.
Ixchel has a hatch in the passageway directly outside the head. I
think the opening is about 7 inches square. It is much easier to
access the forward bilge this way, than through the head, as there is
no need to remove the grate and there is more room above to manuever
to check the compression post beneath the mast and to access the
bottles of wine or whatever in the bilge.
The passageway floor here is made up of the faux plywood laid teak
floor beneath which there is a solidified fiberglass-resin mush above
the flat horizontal roof of the forward bilge. Make the hole rather
near the head door, as the mush is least thick there. I suppose that
if you make the hole too far laterally you will find yourself cutting
through the hull rather than the fiberglass mush. It is possible to
make a rather nice hatch here, using the cutout piece and inlaying a
teak frame.
There are probably exact dimensions in the knowledge base, as this
type of hatch was shown in one of the early "SeaWords". Or I can
provide more exact dimensions if required.
Mar 31, 2005 0:26pm
Thanks for the detail and info. Good stuff that. At the risk of being a
pain is there any chance of you letting me have the dimensions? I've
tried without success to find the details on the owners site
Mar 31, 2005 2:52pm
I, also use the fwd bilge for vino storage and have only had moisture is the area twice since I replaced the oak compression post in _95. I installed two inspection ports in the cabin sole for access to the area
Apr 1, 2005 8:45am
The Prior owner of Summerwind installed an 8" Beckson in the middle
of the sole, just forward of the post, and 6" square opening in the
forward, port corner of the head. This is covered with a caulked
piece of plastic.
The bottom 3" of the post was cut off and replaced with 2 SS plates,
4" x 4", 1/2" thick, with bolts at each corner to adjust the space
between the plates. I think it's an excellent system, although
probably took some skinned knuckles to install. No more problems
with rot at the bottom of the post, and easy access to inspect the
bilge.
Apr 1, 2005 3:56pm
A picture or drawing of these plates in place would help, thanks in advance. Bert dF 80K
Apr 1, 2005 5:00pm
My shower floor was resurfaced and the drains plugged up after it was
removed to repair the compression post years before I got my boat. Instead of drilling a new drain, I thought about using a hose with one of those flat, rectangular bronze suction fittings like the one used in the bottom of the icebox. I could run a hose through the grating with the drain pick up there and attach it to a water pump in the cabinet behind the head, run a hose from that to a thru-hull outside. When taking a shower a person would turn the pump on once the water level was about even with the grate. An in-line strainer could be used to prevent the pump from being clogged by hair, or a piece of mesh could be attached to the bronze pick up.
Apr 1, 2005 5:05pm
I have been asked to give the dimensions of the hatch to the forward
bilge on Ixchel. It is located in the passageway, directly outside
the door to the head.
The finished size of the hatch is:
9 3/4" fore and aft
7 3/4 athwartships
It is 1 1/4" thick on its inboard edge and 2 1/8" thick on the
outboard edge.
This hatch is the cutout from the hatch opening, modified. Each edge
is finished with 1/4" thick teak.
The hatch opening is also finished with 1/4" teak on all four cut
edges so that the hatch without the finishing teak is 1" smaller in
the fore and aft as well as in the athwartships dimension than the
unfinished cutout in the passageway floor.
The floor opening (including teak edging) is 1 3/4" outboard of the
head compartment and the after edge of the opening is 4" forward of
the after surface of the head compartment.
There is a lip beneath the edge of the opening for the hatch to bear
on. It also appears to be made of 1/4" teak.
To open the hatch, a 1/4" carriage bolt is set as a loose fit in a
hole in the center of the hatch with a nut epoxied to the bottom of
the bolt so that the bolt can be raised a half inch or so to grasp its
head and raise the hatch. When the carriage bolt is in its down
position, it makes a small smooth lump that does not stub toes.
I did not install this hatch, I had it installed. I am sure there is
more work in creating this hatch than installing one in the head
compartment, but the access to the hatch and the forward bilge is much
better.
Do not make the hatch wider than specification, as the outboard edge
of the hatch is near the hull. I don't think a sabre saw could cut
through this fiberglass mush, it would take a sawsall.
Dick Weaver, SWII 75K
Apr 1, 2005 7:31pm
I think your plan will work. Integrity has a drain and hose from the shower to a pump mounted in the port cockpit locker. There is a switch mounted on the wall of the head that activates the pump. There is a hatch outside the door of the head that gives access to the forward bilge and compression post. This hatch also gives access to the hose which runs back to the pump under the water tank.
Apr 2, 2005 8:21am
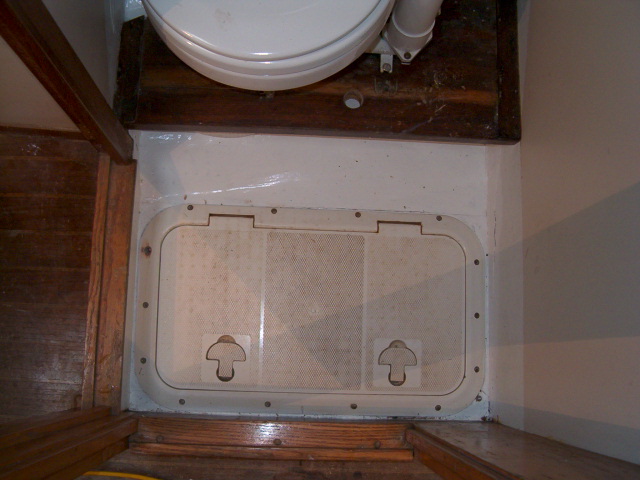
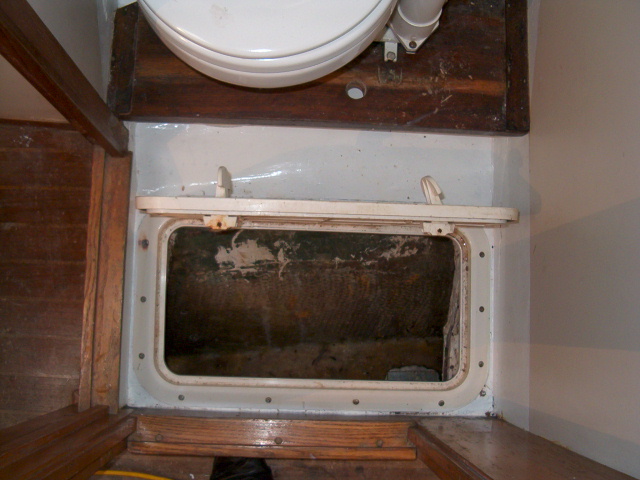
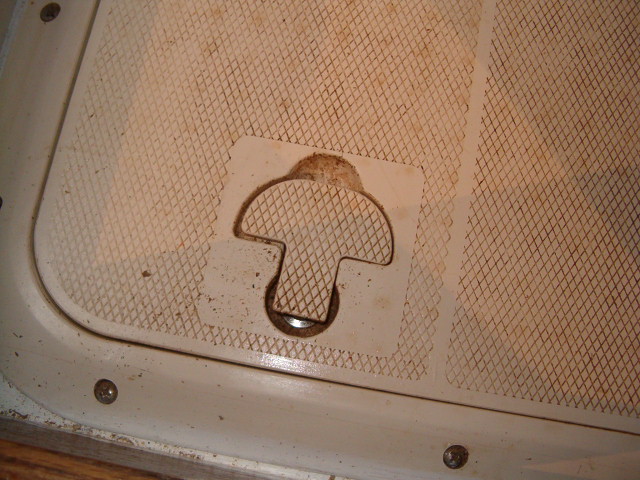
Hello all
I got some pictures that could be interesting for those who need informations about the access of the bilge under the toilet floor. The former owner M. Buckley ( Spirit )did a very good job regarding this access. The clear opening is 10" X 20" which give a very good access where you can put all your head to have a complete inspection of this area. The plastic hatch itself has a good and easy to use opening devices and has gasket all around. Of course this also give an extra locker where you can put several of your best bottles of wine.
Michel no. 119
Apr 2, 2005 8:16am
Hi
I did put the pictures of the bilge access to the photo album HULL
no....
Thank you MichelApr 2, 2005 11:40am
Superb pictures Michel of Spirit!. Any brand name on the plastic hatch?
The pictures I had in mind was of the stainless steel plates and bolting Bob of Summerwindy mentioned separating the (under mast) post's foot from the bilge bottom. Many of us at some time will have to develop such a solution or similar, even if as a Floridian does, we douse each winter the post foot with and antifungus/rot solution. Bert dF of Pianissimo 89K
Apr 4, 2005 1:17pm
I looked at one of those suction fittings and they already have a strainer in them. I believe I'll try to run the hose into the cabinet behind the head, mount the pump in the cabinet, and go out through the hull right
there.
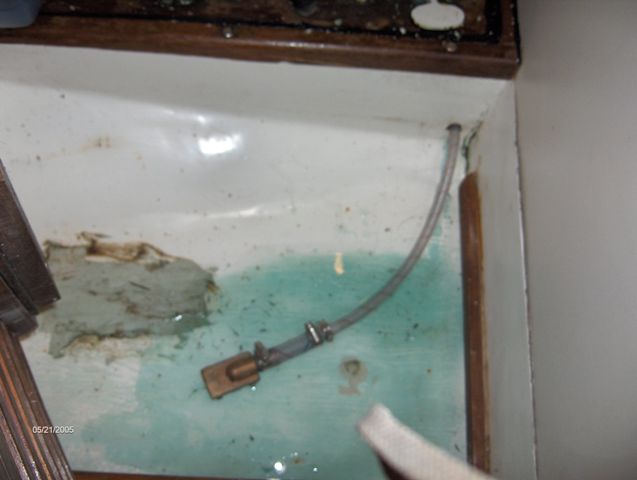
May 21, 2005
Here are some pix from James S.

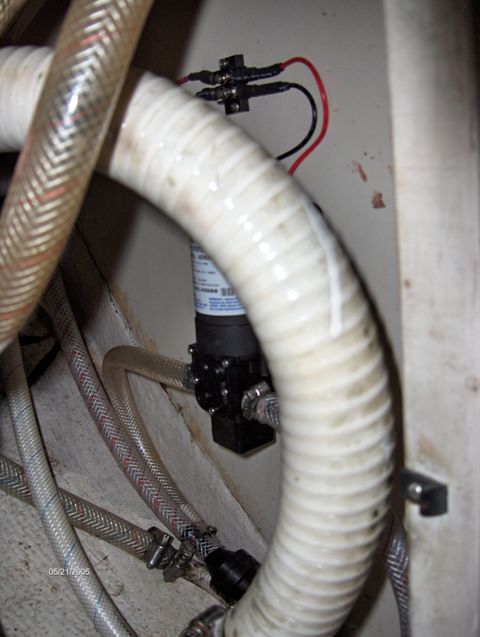
This is a Par Max pump located under the vanity. There is also a strainer
and two check valves, one to keep saltwater from coming in from the outside,
and one to keep water from running from the pump back into the shower.